Hey there, fellow engineers and maintenance teams working in food and beverage (F&B) production—if you’ve ever spent hours troubleshooting inconsistent process pressure readings, or had to rush a last-minute calibration because a transmitter failed mid-batch, you know how critical getting this step right is. I’m Sam, and I’ve spent the last 8 years as a pressure transmitter supplier specializing in F&B-grade instrumentation. I’ve seen it all: installations that led to product recalls because of improper sealing, setups that messed up batch consistency because of wrong pressure ranges, and even regulatory headaches from non-compliant components. Today, I’m walking you through every step to install a pressure transmitter in F&B, no shortcuts, no generic advice—just the lessons I’ve learned from working with 120+ breweries, dairy plants, and snack manufacturers across North America. Pressure Transmitter

First, a quick reality check: F&B isn’t like other industries where pressure transmitters just need to be durable. Your system has to handle everything from sanitary dairy product transfers to acidic fruit juices, strict food safety rules (think 3-A, FDA, EHEDG), and extreme process swings that range from pasteurization temperatures to vacuum drying. I can’t stress this enough—skipping the pre-installation planning step is like trying to assemble a pasteurizer without a manual. Let’s break that down first.
Pre-Installation: The Non-Negotiable Groundwork
Before you even grab the transmitter out of its packaging, you need to confirm two core things: component compatibility and regulatory alignment. Most of the headaches I see start here—last year, a craft brewery I work with bought a standard industrial transmitter for their wort transfer line, and within a week, the food-grade o-rings broke down in hot, acidic wort, causing a shutdown that cost them $45,000 in lost beer. So step one: verify the materials of every single part that touches process fluid. The pressure sensor, diaphragm, seals, and even the fitting hardware all need to meet your line’s specific needs. For example, stainless steel 316L is non-negotiable for most sanitary applications, not the cheaper 304 that many suppliers default to. For dairy, you’ll need EPDM or silicone o-rings that are FDA-listed, while for citrus juice lines, you need perfluoroelastomer (FFKM) seals to resist citric acid.
Next, pick the right pressure type and range. Don’t just go with a generic “range that seems right”—do your homework on your process. If you’re measuring static pressure in a 10-bar pasteurizer, you don’t want a transmitter rated for 1 bar, but you also don’t want a 20-bar unit, which will lose accuracy at lower pressures. I always recommend adding 20-30% headroom to your maximum operating pressure (MOP)—so if your line hits 8 bar max, go for a 10 bar transmitter. Also, choose the pressure type: gauge pressure is standard for open tanks like fermentation vessels, absolute pressure is for vacuum drying chambers, and differential pressure (DP) is for flow measurement or filter level monitoring. Last quarter, a snack processor used DP transmitters to monitor filter clogs in their potato fry oil lines, and by catching clogs early, they cut oil waste by 18%—that’s the kind of ROI we talk about as a supplier, not just a sale.
Also, confirm regulatory compliance upfront. 3-A Sanitary Standards are mandatory for most US food plants, EHEDG for European operations, and FDA 21 CFR Part 177 for material safety. We build our transmitters with these certifications baked in, so our clients don’t have to chase separate component approvals—something I always highlight because it saves teams weeks of paperwork. If you cut corners here, you might face a FDA audit that shuts down your line for days, trust me.
The Installation Site: Location, Location, Sanitation
Now that you’ve got the right transmitter, where you put it matters as much as the unit itself. For sanitary F&B lines, improper mounting is the second-most common cause of transmitter failure (right after material incompatibility). Let’s start with elevation and orientation. First, never mount the transmitter above the process line if you’re measuring liquid pressure—air bubbles will get trapped in the impulse line, causing inaccurate readings that throw off your batch. Last year, a winery I work with had this exact issue: their transmitter was mounted 3 feet above their wine transfer line, and air bubbles made the reading 15% lower than actual pressure, leading to over-pasteurized wine that had to be dumped. So mount the transmitter level with or below the process line. If it has to be above, add a seal pot with glycerin to trap air—just make sure the seal pot is easy to drain and clean, no dead legs that hold food residue.
Orientation matters too. For the diaphragm (the part that touches the process fluid), you want it horizontal if possible, especially for viscous fluids like yogurt or syrup. Vertical mounting can let product build up on the diaphragm over time, which makes readings drift. If you have to mount it vertically, choose a transmitter with a self-wiping diaphragm design—we offer that for viscous F&B lines, and clients say it cuts cleaning time by 30%. Also, avoid mounting near vibration sources like pumps or agitators. Vibration over time can damage the sensor’s internal parts, leading to drift. If you can’t move the transmitter, add vibration dampeners or flexible impulse lines to absorb the shake.
Another big one: no dead legs. Dead legs are sections of pipe that hold stagnant food fluid, which is a food safety risk and can cause bacteria growth. When you install the fitting between the process line and transmitter, keep the connection as short as possible—ideally less than 2 inches, and always at a 45-degree angle so fluid flows back into the main line, not the impulse line. We supply custom fittings for our clients to make this easy, because cutting a custom sanitary connection isn’t something most maintenance teams have time to do on a shift change.
Sanitary Installation: The Step-by-Step That Prevents Contamination
Now we get to the actual physical installation—this is where a lot of teams skip the sanitization step, and it’s a recipe for disaster. Even a tiny bit of old product left on the fitting can contaminate your new batch, or cause a seal leak that leads to product loss. Let’s walk through this step by step, with tips I’ve refined over thousands of installations:
First, prep all components for installation. Take the transmitter and the sanitary fitting (like a Tri-Clamp, the standard for F&B) and soak them in a hot caustic solution (120-140°F) for 10 minutes, then rinse with deionized water. Don’t use regular tap water—minerals can leave residue that builds up over time and causes corrosion or sensor drift. Wipe the diaphragm gently with a lint-free, food-grade cloth—never use a paper towel, which can leave fibers.
Next, apply the seals properly. This is non-negotiable. For Tri-Clamp fittings, make sure the o-ring is the right size, no cracks or cuts, and is seated evenly in the groove—don’t stretch it, which can cause gaps. We always supply extra o-rings with every transmitter we sell, because even a small nick can lead to a leak. When you connect the fitting to the process line, tighten the Tri-Clamp nut evenly, not just on one side. Use a torque wrench set to the manufacturer’s specification—usually 15-25 ft-lbs for sanitary fittings. Over-tightening can warp the flange, leading to leaks, under-tightening can let process fluid seep out. I’ve seen teams guess this step, and a leak on a high-pressure carbonation line at a soda plant once spilled 500 gallons of soft drink across the floor, causing a 6-hour shutdown.
If you’re using an impulse line (which is rare for sanitary lines, but sometimes used for large tanks), make sure it’s sloped 1/4 inch per foot towards the process line. This prevents liquid from getting trapped if you’re measuring gas or vapor pressure—for example, in a steam line. Also, if you’re installing a DP transmitter for level measurement in a tank, the low-pressure side needs to be connected to the vapor space at the top of the tank, and both lines need to be the same length to avoid pressure differences that mess up readings.
Wait, and don’t forget to install pressure relief valves before any transmitter connected to lines over 10 bar. If the process spikes unexpectedly, the relief valve will open and protect the transmitter from damage. We always include valve recommendations for each client’s specific line, which is a small detail but saves them thousands in replacement costs.
Post-Installation: Calibration and Testing That Saves Batches
A lot of teams think plugging in the transmitter and turning it on is the end—no. The most important step after installation is calibration and testing, because even a perfectly installed unit can have factory shifts or shipping damage that throw off readings. Here’s what I do with our clients during startup:
First, perform a static calibration. Use a calibrated pressure gauge (we can recommend portable units that are popular in F&B plants) to test the transmitter against a known pressure source. For example, if your pasteurizer is at 5 bar, the transmitter should read exactly 5 bar, within 0.1% accuracy (the standard for F&B process control). If it’s off, adjust the zero and span settings using the transmitter’s HART protocol or local display. Last year, a craft distillery I worked with skipped this step, and their transmitter was reading 2 bar low, leading to under-distilled whiskey that had to be re-run, costing them $20,000 in lost product and labor.
Next, test the system under process conditions. Don’t just test it with air—run water or the actual process fluid through the line to check for leaks and adjust readings. Watch for 10-15 minutes during startup: check the Tri-Clamp fittings for drips, the impulse line for air bubbles, and the transmitter’s display to make sure the pressure stays consistent with the process control system. Also, perform a drain test: open the line’s drain valve to make sure no fluid gets trapped in the transmitter, which would cause readings to drop when the line is drained and cleaned.
Also, document everything. F&B plants need detailed records for audits, so write down the installation date, transmitter serial number, calibration date, torque setting for the Tri-Clamp, and any issues found during testing. We provide a free digital log template for all our clients, because I know how much time paperwork takes—this small tool has helped dozens of plants pass 3-A audits without any issues.
Common Mistakes We See (And How to Avoid Them)
Over 8 years, I’ve seen the same mistakes over and over, so let me share the fix for each, because these are easy to avoid:
- Using the wrong cleaning agents for the transmitter: Never use bleach or abrasive cleaners on the transmitter body, because they can etch the stainless steel and harbor bacteria. Use only food-grade, non-abrasive cleaners, and make sure the transmitter is disconnected from the line during CIP (Clean-in-Place) or SIP (Steam-in-Place) cycles if it’s not CIP-rated. We make all our transmitters CIP-capable for 150°F CIP and 275°F SIP, so that’s one less thing our clients have to worry about.
- Ignoring the transmitter’s electrical wiring: Wet or improper wiring is the third-most common cause of transmitter failure. For F&B lines, which have high humidity and regular washdowns, use food-grade, waterproof electrical conduits and seal all connections with food-grade silicone. Don’t run wiring near steam lines, which can damage insulation over time. We supply wiring kits designed specifically for F&B washdown environments, so our clients don’t have to source random parts that don’t hold up.
- Forgetting to test during CIP cycles: A lot of teams install the transmitter, test it with process fluid, and call it good—but CIP cycles create extreme pressure and temperature swings that can break a poorly installed unit. After the first installation, run a full CIP cycle and check the transmitter’s performance. We had a yogurt plant that skipped this, and their transmitter failed during the first CIP, leading to 10 hours of downtime and 2,000 gallons of lost yogurt.
Wrapping It Up: This Isn’t Just a Sale, It’s a Long-Term Fix
At the end of the day, installing a pressure transmitter in F&B isn’t about tightening a few nuts—it’s about protecting your product, your regulatory compliance, and your bottom line. Every step I’ve walked you through—from pre-installation material checks to post-CIP testing—has one goal: keep your process running smoothly, avoid costly shutdowns, and make sure your product is safe for consumers.
If you’re working on a new line, upgrading an old one, or having issues with your current transmitters, I’m here to help. We work with plants of all sizes, from small craft breweries to large multinational dairy companies, to supply the right transmitters, fittings, and support to get the job done right. We don’t just sell parts—we partner with you to make sure your installation works, now and for years to come.
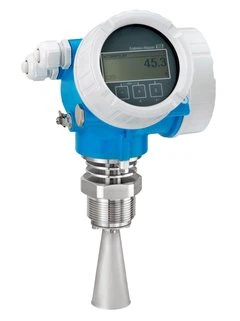
Don’t wait for a costly shutdown to fix your pressure transmitter setup. Reach out to our team for a consultation today, and we’ll walk through your specific process needs, share case studies from similar plants, and help you choose the right solution for your operation. The difference between a good installation and a great one can save you thousands in lost product, downtime, and audit headaches. Let’s make your process more reliable—together.
References
Rosemount Valve Positioner Sanitary Pressure Transmitter Installation Guide, 3-A Sanitary Standards, Inc. (2022)
Pressure Measurement for Food and Beverage Processing, EHEDG Guidelines (2021)
FDA 21 CFR Part 177: Materials Used in Contact with Food, U.S. Food and Drug Administration (2023)
Iges Instrument Co., Ltd.
With abundant experience, we are one of the most professional pressure transmitter suppliers in China. Please feel free to buy high quality pressure transmitter in stock here and get quotation from our factory. Good service and low price are available.
Address: No. 103, 1st Floor, Dacheng Commercial Building, Chezhan Avenue, Lucheng District, Wenzhou City
E-mail: igesinst@gmail.com
WebSite: https://www.iges-inst.com/
